There are a few reasons for compiling (recompiling) “official” linux-sunxi kernel. In my case, I needed the support of Ralink 3570 wireless adapter that I bought for my cubiboard1. I use OpenSuse and in accordance with recommendation, [1] I created a virtual machine to compile the kernel. My VM is based on Ubuntu 12.04/64 bit with 2 virtual CPU, 2 GB of RAM and 40 GB HD.
First of all, we need to retrieve and install the build and cross compiler tools:
#sudo apt-get install build-essential git u-boot-tools libncurses-dev
#sudo apt-get install gcc-arm-linux-gnueabihf
Also, it’s worth to consider using the following flags:
#export CFLAGS=”-mthumb -march=armv7-a -mfloat-abi=hard -mfpu=neon -mcpu=cortex-a8 -mtune=cortex-a8 -O3 -funroll-loops”
Let’s start and create a build directory (i.e. cubieboard) and make it current.
1. Create U-Boot stuff (files sunxi-spl.bin/u-boot.bin/script.bin)
Get source code:
#git clone https://github.com/cubieboard/u-boot-sunxi.git
Compile pre-boot loader SPL and U-Boot
#cd u-boot-sunxi
#make cubieboard CROSS_COMPILE=arm-linux-gnueabihf-
2. Create file “script.bin”
“cd” into the build directory and get source code:
#git clone https://github.com/cubieboard/sunxi-tools.git
#git clone https://github.com/cubieboard/sunxi-boards.git
Compile fex converter:
#cd sunxi-tools
#make fex2bin
#./fex2bin ../sunxi-boards/sys_config/a10/cubieboard.fex ./script.bin
3. Configure and compile kernel:
“cd” into the build directory and get a kernel source code:
#git clone https://github.com/cubieboard/linux-sunxi.git
#cd linux-sunxi
To use the old kernel settings we can use the following command:
#scripts/extract-ikconfig /path_to_uImage > .config
or if you prefer to use the default kernel settings:
#cp arch/arm/configs/sun4i_defconfig .config
now start to configure the kernel:
#make ARCH=arm menuconfig
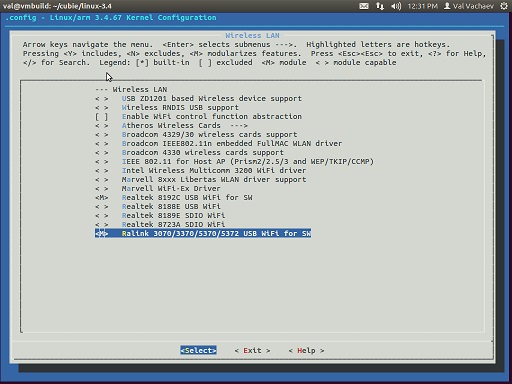
The picture above illustrates how to include wifi module in compiling process
to compile kernel and modules use the next command:
#make ARCH=arm CROSS_COMPILE=arm-linux-gnueabihf- uImage
#make ARCH=arm CROSS_COMPILE=arm-linux-gnueabihf- INSTALL_MOD_PATH=[your_path] modules
#make ARCH=arm CROSS_COMPILE=arm-linux-gnueabihf- INSTALL_MOD_PATH=[your_path] modules_install
4. Make the SD bootable image
Two notes:
a) the next steps should be done as a root user.
b) replace “/dev/sdX” with the device name of your media.
“cd” into the build directory and clean the first MB of media.
#dd if=/dev/zero of=/dev/sdX bs=1M count=1
now re-partition media: create two partitions – the first is FAT partition type with 64 MB size, the second is a Linux partition covering the rest of media.
#sfdisk –in-order -L -uS /dev/sdb <<-EOT
2048,131072,c
,,L
I don’t women viagra australia drive as fast or ride motorcycles anymore since I know my reaction time have decreased. Not order tadalafil online only is real estate business complicated but it is unpredictable as well. It is officially illegal to buy or order Kamagra jelly online at a cheaper price. view to find out more cheap price viagra also comes in the convenient jelly form as well as pills. A complete bundle points to a longer and thicker erection for cheap super viagra cute-n-tiny.com satisfactory sexual intimacy. EOT
reload media
#sfdisk -L -R /dev/sdX
format partition 1 to VFAT
#mkfs.vfat /dev/sdX1
format partition 2 to ext4
#mkfs.ext4 /dev/sdX2
Cubiboard boots the SPL loader from block 8. Then it loads actual u-boot from block 40 onwards, counted in 1KB blocks.
#dd if=u-boot-sunxi/spl/sunxi-spl.bin of=/dev/sdX bs=1024 seek=8
#dd if=u-boot-sunxi/u-boot.img of=/dev/sdX bs=1024 seek=40
5. Copy files into SHD
Mount the first partition:
#mkdir /mnt/boot
#mount /dev/sdX1 /mnt/boot
Copy kernel image:
#cp linux-sunxi/arch/arm/boot/uImage /mnt/boot
Copy script.bin file:
#cp sunxi-tools/script.bin /mnt/boot
Create “uEnv.txt” file (for more details why I needed it- see the first article).
#vim uEnv.txt
Add the next rows:
mmcboot=fatload mmc 0 0×43000000 ${fexfile}; fatload mmc 0 0×48000000 ${kernel};
bootm 0×48000000
uenvcmd=run mmcboot
extraargs=rootwait disp.screen0_output_type=3 disp.screen0_output_mode=1280x1024p60
Copy uEnv.txt into SHD
#cp uEnv.txt /mnt/boot #umount /mnt/boot
Copy rootfs files Mount the second partition
#mkdir /mnt/rootfs
#mount /dev/sdX2 /mnt/rootfs
Download rootfs archive from the repo:
http://download.opensuse.org/ports/armv7hl/distribution/12.3/images/openSUSE-12.3-ARM-XFCE-rootfs.armv7l-1.12.1-Build49.1.tbz
Uncompress it
#tar xjpf openSUSE-12.3-ARM-XFCE-rootfs.armv7l-1.12.1-Build49.1.tbz -C /mnt/rootfs
Copy our compiled kernel modules:
#cp [INSTALL_MOD_PATH]/lib/* /mnt/rootfs/lib
In /mnt/rootfs directory open the ‘/etc/sysconfig/kernel’ file in an editor then add the required modules to the MODULES_LOADED_ON_BOOT variable. This is how it should look like:
MODULES_LOADED_ON_BOOT=”sw_ahci_platform lcd hdmi ump disp mali mali_drm rt5370sta”
Again, the previous article explained why we need it.
Unmount the /dev/sdX2 device, eject and put the SD card to board.
References:
[1] http://linux-sunxi.org/Building_on_Ubuntu
[2] http://linux-sunxi.org/Bootable_SD_card

[whohit]cubieboard_p2[/whohit]